
Hello Everyone,
In this post, I would like to continue how I built my blog using GitHub pages and Jekyll at free of cost and maintenance.
Here is the link to my previous article
In my previous post we saw what Static file generators are and how they help us, creating a site with Jekyll. In this post, we will dig deep into some basic concepts of Jekyll.
Basic Building Blocks Of Jekyll
- Pages
- Liquid Template Language
- Posts
- ** Front Matter**
- ** Collections**
- Data Files
- Assets
- Static Files
These are the key aspects of Jekyll for building a static site. Let’s see each of them in detail.
Pages
Pages are basic building blocks for content. Some examples of Pages in blogging perspective are “About Me”, “Contact Us”, “Areas Of Interest”. If you see these pages are independent and doesnt actually deal with actual blog content like posts.
A simple way to create Pages is to add “Name_Of_the_file.md” in root directory
In the default template created, we can see “about.md” and “index.md”
In my blog, I use “posts_by_tags.md”, “posts_by_date.md”, “contact.md”
Posts
You write blog posts as text files and Jekyll provides everything you need to turn it into a blog.
The _posts folder is where your blog posts live. You typically write posts in Markdown, HTML is also supported.
Usually, a post file name starts in this format YEAR-MONTH-DAY-title.md where year is 4 digit year, Month, Day is 2 digit. A sample post looks something like this
File Name: 2019-01-01-Welcome-Post.md
---
layout: post
title:  "Welcome to Xyzcoder.github.io"
---

# Hello Welcome To xyzcoder.github.io

**This is a sample blog post**,  in Jekyll.
Front Matter
Frontmatter is the section present at the starting of a file and this will be processed by Jekyll. This is the YAML syntax and it should be present in the starting and between 3 dashes as opening and closing.
For example
---
layout: post
title:  "Welcome to Jekyll!"
date:   2019-11-10 17:34:24 +0530
categories: Jekyll update
---
We can have predefined variables and also custom variables that can be accessed in the file’s liquid tags or even in pages and also include files.
I’ll show a sample Front Matter code which I use in almost all my blog posts
---
title: AWS VPC Peering Connection
layout: post
date: '2018-05-15 22:19:51'
comments: true
categories:
- AWS
- VPC
- VPC-Peering
author: Pavan Kumar Aryasomayajulu
---
title: Specifies the title of the page
layout: For specifying which layout file to be used. We will see details of a layout file shortly.
comments: This is a custom variable which I am using and In my case, I accept true and false for this and based on the value provided, I’ll display comments section in my post.
categories: This is how an array is declared in YAML and here I have 3 categories AWS, VPC and VPC-Peering
How do we use these variables: All variables declared in a
<h1></h1>

{ % for category in page.categories %}
        <span class="tag">#</span>
{ % endfor %}
Important Point: It is important to note that the title, date, and categories will have an impact on the URL of the post which is generated.
For example for the above configuration, this is how the URL of my post looks like because when Jekyll generates a static HTML page using the above configuration, it creates a folder structure based on the data provided.
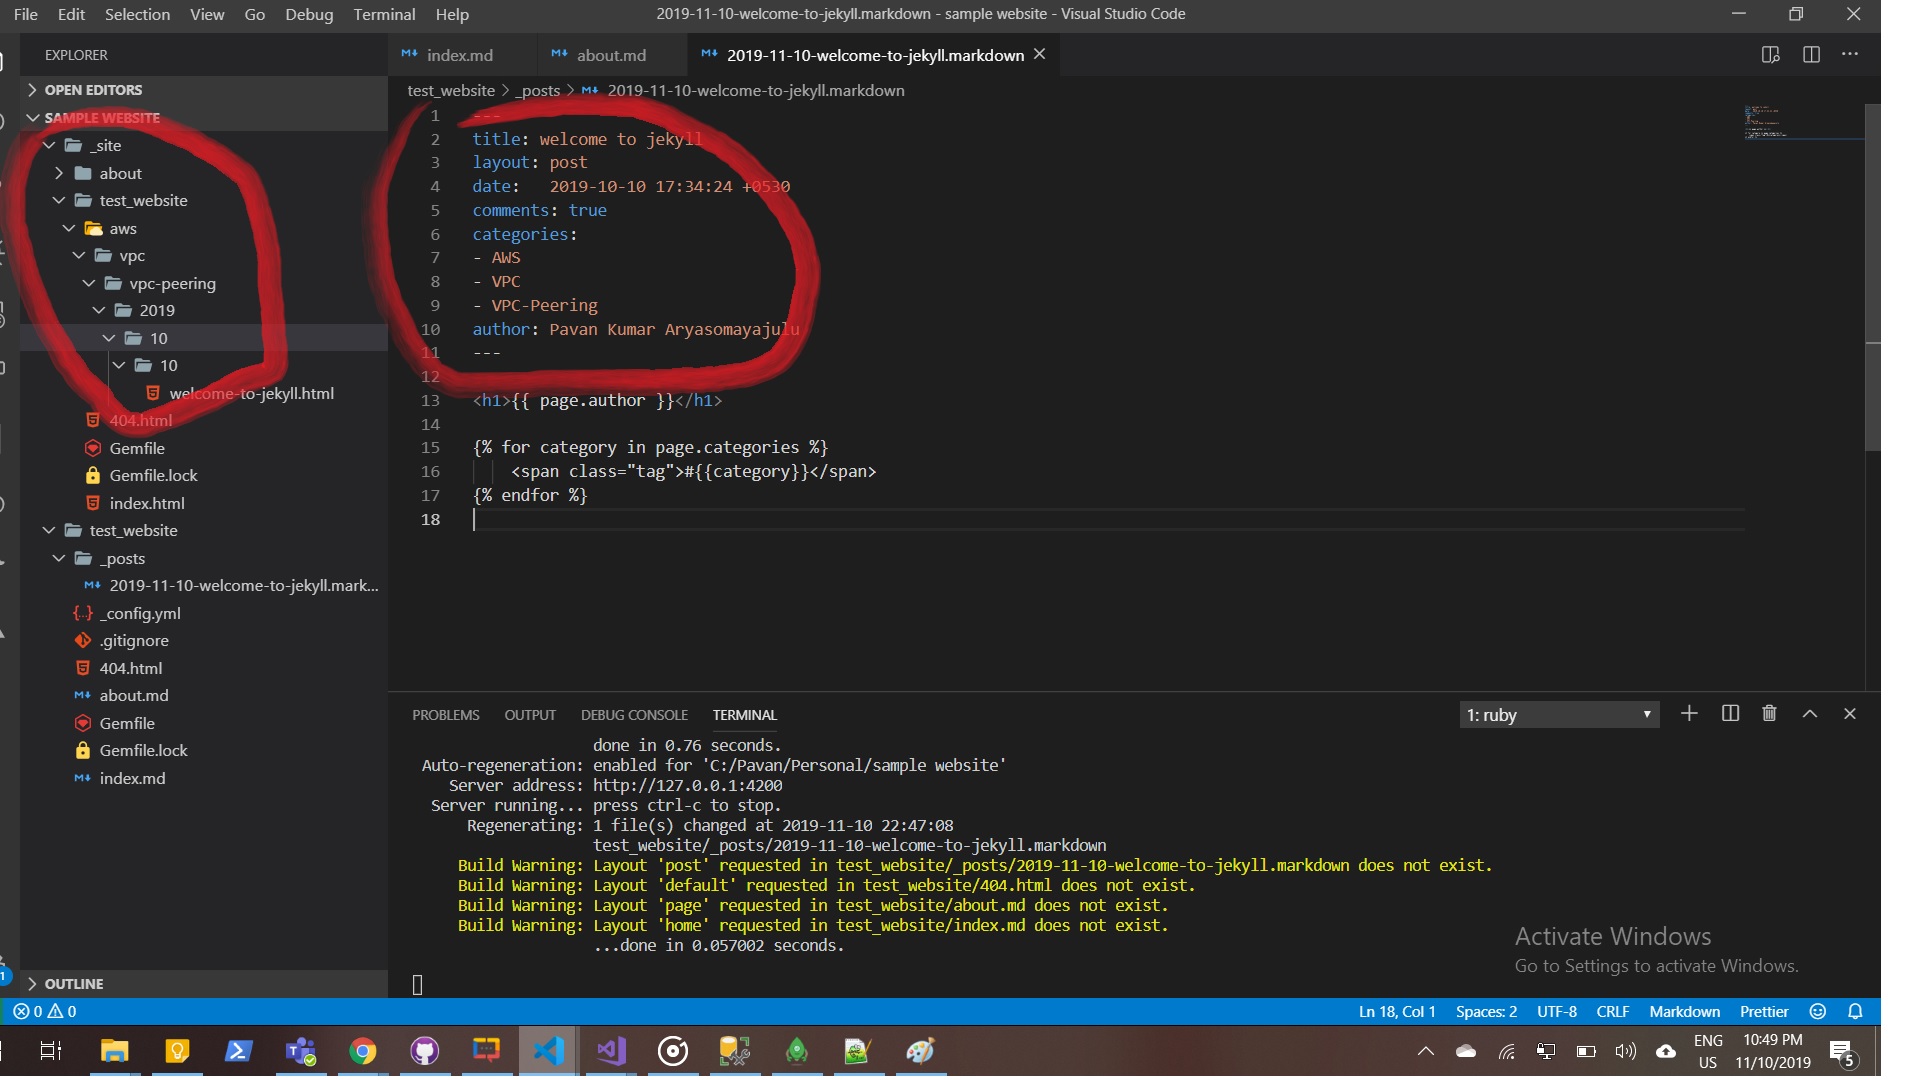
So here if we see _site, This is where generated HTML content is stored. The location of the file is decided based on Categories, date
Assets and Static Files:
This is the place where we can place our sass files, CSS and js files and also we can have all our static image file as subfolders under assets.
_includes:
Includes folder is mainly used for storing HTML files that contain code which can be plugged into any pages or posts.
How to configure a blog
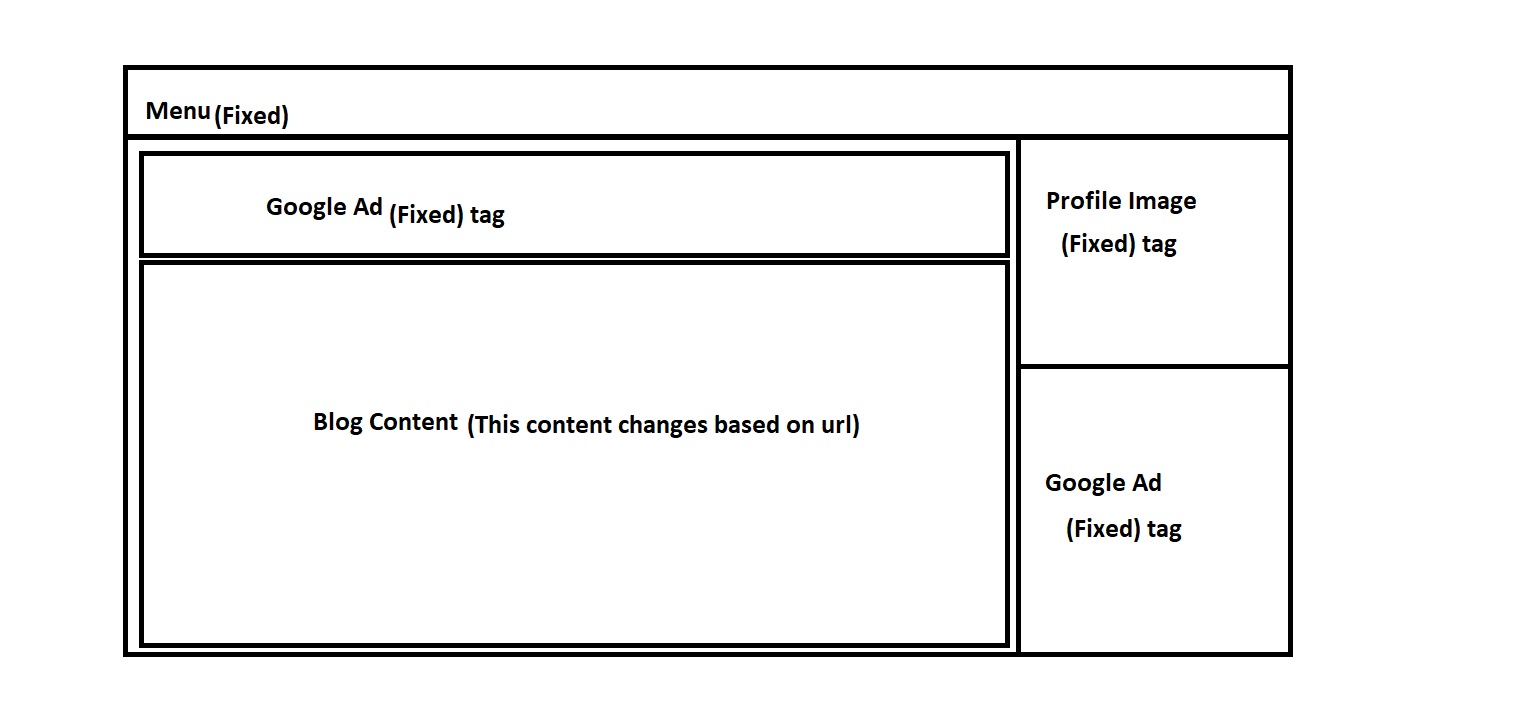
Now, I’ll show you how We can configure a blog using different components present in Jekyll. This is the layout of my blog and we can see except blog content, everything else is almost static HTML.
Note: This is the layout of a static page and my index page is almost the same except that I’ll list all my blog titles over there.
Initially I am creating a Layout file which represents the layout of my blog.
This is placed under _layout folder.
Filename: posts.html
<!DOCTYPE html>
<html lang="no-js">
{% include head.html %}

<body>

    <div class="topnav" id="myTopnav">
        <a href="{{ site.baseurl }}/index.html" class="active">Blog</a>
        <a href="{{ site.baseurl }}/about.html">About Me</a>
    </div>

    <div class="wrapper">
        <div class="container">
            <div class="row">
                <div class="col-md-12">
                    <div class="row">
                        <!-- profile -->
                        {% include profile_widget.html %}
                        <!--end profile -->

                        <!-- blog content -->
                        {% include blog_content.html %}
                        <!--blog content -->
                    </div>
                </div>
            </div>
        </div>
        {% include scripts.html %}
</body>

</html>
**Some Key takeaways in this: **
{% include head.html %} {% include profile_widget.html %} {% include blog_content.html %}All scripts and CSS files or common HTML that needs to be included in my blog are fixed and they are same for all pages. So I wanted to have all scripts and CSS files references included in head.html file and I’ll reuse that If I need them in any other places.
index.html:
This is my blogs index page and here I would like to list all my blog posts.
Here I specified my layout as “post.html” and also I am sending a custom variable “isindex”. Also, you can see, I am looping on posts by using the following syntax
{% for item in site.posts %}
---
layout: post
title: Xyzcoder
isindex: true
---

<br>
<br>

<h1>List of posts</h1>

{% for item in site.posts %}
<article class="blog-article">

    <div class="col-md-12">

        <div class="row">
            <div class="col-md-12 post_content">
                <div class="content post_format_standart">
                    <div class="top_c ">

                        <div class="title_content">
                            <div class="text_content" style="width:100%">
                                <a href="{{ item.url }}"  style="float:left;position:relative">{{ item.title }}</a>
                            </div>

                            <div class="clear"></div>
                        </div>
                </div>

            </div>
        </div>

    </div>
    </div>
</article>
{% endfor %}
Please download the sample blog content I am using from this zip file and make use of it https://xyzcoder.github.io/download.zip
Thanks,
Pavan Kumar Aryasomayajulu