
Hello Everyone,
In this post, I would like to discuss on how I successfully built (xyzcoder.github.io) my blog at free of cost and maintenance.
Technologies I am making use of for building and maintaining my blog (xyzcoder.github.io)
- Jekyll
- Github Pages
- Javascript
- HTML
- Ruby(But we don’t need any prior knowledge of it and it is not directly used by us)
What is Github Pages
GitHub Pages are public webpages hosted for free through GitHub. GitHub users can create and host both personal websites (one allowed per user) and websites related to specific GitHub projects. Pages lets you do the same things like GitHub, but if the repository is named a certain way and files inside it are HTML or Markdown, you can view the file like any other website. Pages also come with a powerful static site generator called Jekyll, which we’ll learn more about later on.
In other words, Gitpages allows you to create your blog( Static) by committing HTML or markdown files into your repository.
How to create Github Pages
Head over to GitHub and create a new repository named username.github.io, where username is your username (or organization name) on GitHub.
If the first part of the repository doesn’t exactly match your username, it won’t work, so make sure to get it right.
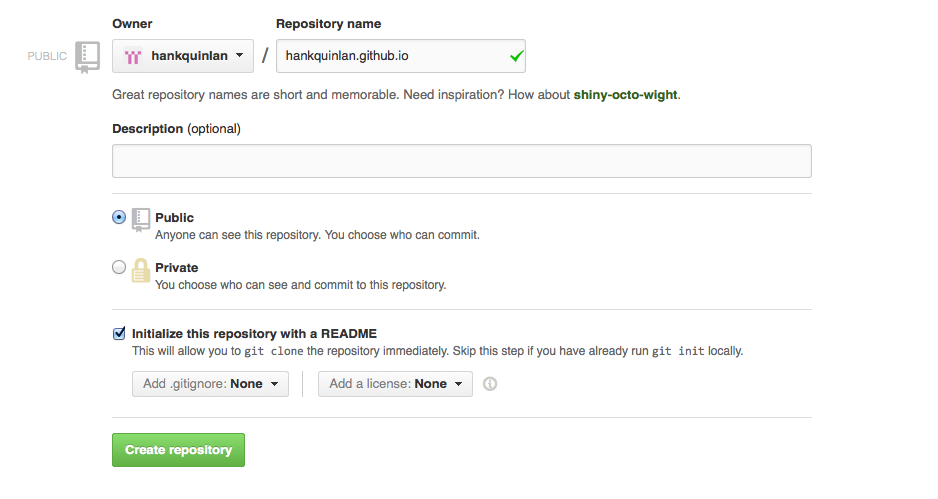
Now commit index.html page into the GitHub repository and try to browse “username.github.io”. Now you should see the content of the HTML page.
So How does Static Site Generators come to our rescue
So in the above step, we saw how to host our HTML page in Github pages. If it is a simple application we can directly upload our HTML pages and maintain them. But what if I want to build a blog or static site with 100’s of pages. Is it as simple as the above approach? A big NO. And a few reasons are…
- If I want to add a new URL to my menu items and if it is a small application, I can go to each page and then modify my application to add that menu item’s url. But If my application has 100’s of pages then I cannot go to every page and modify them
- I want to have a theme for my blog with some static header and footer. As this is a static HTML page blog, I need to repeat the same code for the header and footer in all the pages. And It will be difficult to modify/add the content on every page.
- The same is the case with including javascript or CSS pages/links common to the entire application.
- Reusability– let’s say I have a small snippet of HTML code which needs to be included in all pages. For example, I need to include an HTML form on all pages. So even in this case, I need to duplicate all my code.
- No database. Unlike WordPress and other content management systems (CMS), Static site generators don’t have a database. All posts and pages are converted to static HTML before publication. This is great for loading speed because no database calls are made when a page is loaded.
What is Jekyll:
Jekyll is a parsing engine bundled as a ruby gem used to build static websites from dynamic components such as templates, partials, liquid code, markdown, etc. Jekyll is known as “a simple, blog-aware, static site generator”. Just like some NuGet(In .Net), Maven(in Java), NPM(In node.js, Javascript) Jekyll is a package developed in Ruby.
Why Jekyll:
So once I decided to go with Static web pages for my blog, I want to go with Jekyll because it is supported by Github pages and also a few advantages which I found
For every problem discussed in “So How does Static Site Generators come to our rescue” section can be handled easily with these static site generators like Jekyll.
- Ability to write content in markdown.
- It is not required to have a separate database and hence I can go with hosting providers like GithubPages, Firebase and few more
- I can run the software just in my machine for preview and I don’t need any internet.
- I can make use of text editor on my local machine for writing blog posts and publish the generated content to Github pages
- I can use various themes available in the market and modify them as per my requirement
- I can break down my code into templates and also I can have layouts that can be used in different pages conditionally.
Installing Jekyll:
For installing Jekyll, we need to have ruby installed on our machine.
Please go through the official URL for installation steps:
Installation Steps
Getting started with Jekyll
Once the installation is successful, we can start building our blog with minimal effort.
Steps for Getting Started:
- Navigate to the folder where you would like to create your website code
Jekyll new YOUR_REPO_NAME- Once we use the above command it will create a gem file and few other files required to get started. GemFile is similar to Package.json in Node. It also installs required packages mentioned in the GemFile
- Now running
Jekyll build YOUR_REPO_NAME. This will build the code and it will create a folder called _sites which has generated HTML code. - Finally, to run our blog on localhost, we need to execute the following command
jekyll serve -P 4200 - Here -P flag is used to specify the port number. Once the above command is issued, we can see the live server running on port 4200.
- Once we are ok with our file changes, we can commit our code to Github and after few minutes, you can browse
your_username.github.io.
Now we can see our blog running successfully
** Part2 of this post** Here is the link to part2 of this article
Thanks,
Pavan Kumar Aryasomayajulu